This tutorial shows you how you can create a single partition on a disk drive with many smaller fragmented partitions easily.

There are many situations that can lead to the population of a disk drive by different fragmented partitions. For instance, you might want to repurpose a USB thumb drive that has been used to create a bootable medium for installation purposes, to be used as a drive for file storage/transfer.
But you find out that the thumb drive contains some partitions that are unusable taking a lot of space, or rather you just want the thumb drive to contain a single partition for easy management. Then this post is for you.
Let’s get started!
NB: The steps outlined here will work for any disk drives (HDD, SSD, etc) connected to Linux – either externally or internally.
And also note that this can also be achieved using graphical applications like GParted; a command-line approach is not a bad skill to have in some serious desperate situations.
THE fdisk COMMAND
There is a very useful command-line utility for doing this – fdisk. The fdisk is a very important tool for working with partitions of disk drives. It is interactive, accepting commands from the user to carry out its various functions.
I’m going to be illustrating this with a thumb drive with 8GB memory space, and contains an unwanted bootable hidden partition.

STEP 1 – Get Root Access.
Subsequent steps after this require root (admin) access (or you’d have to be type sudo along with every command after). So switch to the root user. By entering this command and providing your password ;
sudo suSTEP 2 – Type the command to locating the disk drive:
fdisk -l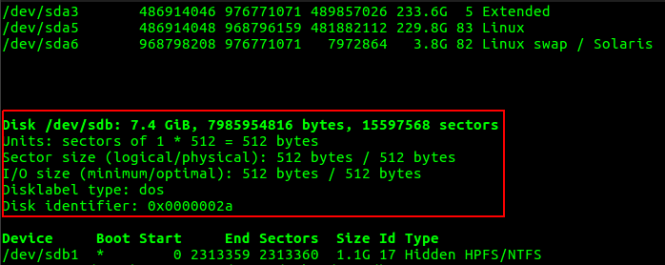
So as not to get confused, you can enter the command before inserting the USB drive and noting the output; then after connecting the drive enter the command again and then spot the difference. This is very important for you not to delete useful partitions in your computer hard drive (HDD).
STEP 3 – Select the desired disk drive for manipulation ;
fdisk /dev/sdXwhere X = the drive letter, like ‘b’, ‘c’, and so on.
fdisk /dev/sdb
Then the fdisk command prompt appears for you to enter commands.
STEP 4 – Enter the letter d to delete the partition(s)
If there are more than one partitions you can specify with numbers by enter code]1[/code] or 2 (for the first and second partitions respectively) as the case may be. Since my disk drive contained just one partition it was automatically deleted.
STEP 5 – Create new (single) partition; Enter: n
STEP 6 – To make it a primary partition, Type: p
STEP 7 – To make it the first partition, Type: 1
STEP 8 – To accept the default first cylinder, press: ENTER.
STEP 9 – To accept the default last cylinder, press: ENTER.
STEP 10 – To write the new partition to the disk, Type: w.

There! You now have a single partition in the entire disk drive.
STEP 11 – Create a new file -system;
If the disk is mounted, unmount it using umount /dev/sdX.
And then create a new filesystem, since mine is a thumb drive, I’ll use FAT (the default for thumb drives.);
mkfs.vfat -F 32 /dev/sdb
DONE!!!
Happy Linux’NG!